9.9.10
Back to posting
Time to get back to posting to this little gem of a blog I have here. What to blog about is the only question...


28.5.10
Gmail: Forwarding only actual email to your Blackberry
If you are like me and setup your primary Gmail account with your Blackberry, or other smartphone, you more than likely get tired of all the "junk" email that goes to your device and startrs it blinking at 230am. This junk for me was mainly mailing lists as I am on a few in the Linux world. Well let's see if we can clean up this little issue.
Some people say why don't you just use the Gmail app for Blackberry devices?
A. Because for me it freezes constantly and breaks my data connection, I'm not the only one. But if you want to use it keep that in mind and also that it hasn't been updated in around 2 years.
What you will need:
1. A computer to access your Gmail account
2. A Blackberry email address(optional, you can setup a new gmail acct too)
3.
Procedure:
Ok lets log into our gmail account and click on Settings, click Filters, Create a new Filter. Now here is where we need to put in some information in regard to what we WANT forwarded. I have a list of email domains that I have compiled that is in no way exhaustive but a start, I add to it all the time.
In the FROM field:
*@gmail.com|*@hotmail.com|*@yahoo.com|*@att.blackberry.net|*@vzw.blackberry.net|*@aol.com|*@msn.com|*@live.com|*@roadrunner.com|*@gmx.de|*@gmx.net
This covers a majority of the providers, in order to add more use the pipe(|)and a star(*) - Important NO SPACES or the rule will fail. So if I wanted to add ACME corporations email I would simplty append |*@acme.com to the end of the string.
In the TO field:
MyEmail@gmail.com
I leave HAS THE WORDS and SUBJECT empty because I want almost all email to come through.
In the DOESN'T HAVE feild:
cdlug-general OR chat OR LTP
Put the key words you DON'T want forwarded, seperated by OR. You can use other boolean phrases also, but I will not cover them in this article.
**I highly suggest you put "chat" in the feild. If you don't every gchat you have will be forwarded to your phone and that can get annoying.
Once you are done with that hit "Next Step"
Now place a check in the box next to "Forward it To:" select your forwarding address. if you have not set one up yet simply click "Manage your forwarding address", select "add new", put in your blackberry.net address and await the verification code. Once the code comes type it into the box and click "Save changes" at the bottom of the page, you will be returned to the Filters page.
Now you can hit "Create filter", I do not suggest checking the apply to XX number of conversations below or you may clog up your blackberry.
Done. Now all email from the email domains we setup in the begining will be forwarded to your blackberry and all the ones you don't want will stay in the cloud.
Hope that helps! If you have any questions/comments please feel free to post them!
Dan
Some people say why don't you just use the Gmail app for Blackberry devices?
A. Because for me it freezes constantly and breaks my data connection, I'm not the only one. But if you want to use it keep that in mind and also that it hasn't been updated in around 2 years.
What you will need:
1. A computer to access your Gmail account
2. A Blackberry email address(optional, you can setup a new gmail acct too)
3.
Procedure:
Ok lets log into our gmail account and click on Settings, click Filters, Create a new Filter. Now here is where we need to put in some information in regard to what we WANT forwarded. I have a list of email domains that I have compiled that is in no way exhaustive but a start, I add to it all the time.
In the FROM field:
*@gmail.com|*@hotmail.com|*@yahoo.com|*@att.blackberry.net|*@vzw.blackberry.net|*@aol.com|*@msn.com|*@live.com|*@roadrunner.com|*@gmx.de|*@gmx.net
This covers a majority of the providers, in order to add more use the pipe(|)and a star(*) - Important NO SPACES or the rule will fail. So if I wanted to add ACME corporations email I would simplty append |*@acme.com to the end of the string.
In the TO field:
MyEmail@gmail.com
I leave HAS THE WORDS and SUBJECT empty because I want almost all email to come through.
In the DOESN'T HAVE feild:
cdlug-general OR chat OR LTP
Put the key words you DON'T want forwarded, seperated by OR. You can use other boolean phrases also, but I will not cover them in this article.
**I highly suggest you put "chat" in the feild. If you don't every gchat you have will be forwarded to your phone and that can get annoying.
Once you are done with that hit "Next Step"
Now place a check in the box next to "Forward it To:" select your forwarding address. if you have not set one up yet simply click "Manage your forwarding address", select "add new", put in your blackberry.net address and await the verification code. Once the code comes type it into the box and click "Save changes" at the bottom of the page, you will be returned to the Filters page.
Now you can hit "Create filter", I do not suggest checking the apply to XX number of conversations below or you may clog up your blackberry.
Done. Now all email from the email domains we setup in the begining will be forwarded to your blackberry and all the ones you don't want will stay in the cloud.
Hope that helps! If you have any questions/comments please feel free to post them!
Dan
16.11.09
Exchange Server 2003 fun
Well with my new job in NY being very Microsoft centric I have run into the normal bevy of MS related issues. Namely random crashes, corruption and crap, I like to call it C3. The latest has been a blast to deal with.
How to add yourself as an Exchange Full Administrator without using ESM Delegation in my case this was because I couldn't use the ESM Delegation Wizard
Original issue: An Exchange mailbox had been corrupted and I needed to restore it from a backup. So I thought this should be easy(wrong).
Actions: I setup a Recovery Group just like I was supposed to and mounted the store recovered the mailbox etc.
Problem created: When trying to add a new user the new user's mailbox is created in the recovery group. This has to be one of the dumbest designs ever but, fine I will just delete the recovery group that I created and then recreate the user. Halt! Microsoft decided that is not a good idea and even though I created the RG I can't delete it, mind you I am logged in as a Local/Domain/Enterprise Admin so I should have super powers right? Nope.
Microsoft restricted that aspect to only Exchange Full Administrators(EFA). Fine, I looked around and figured out how to add an account as an EFA, this should be easy right? Wrong.
You cannot add an account to be a EFA unless you have an account and login credentials for an EFA. Now what? Off to Google I go.
A solution finally!
1. Log into the Exchange server with local/domain/ad admin rights
2. Run regedit and navigate to HKEY_CURRENT_USER\Software\Microsoft\Exchange\ExAdmin
3. Create a new dword called ShowSecurityPage
4. Set the value from 0 to 1
5. Close the ESM if open
6. (re)Open the ESM
7. Right click on your Exchange Organization, select properties, Add the desired account with FULL access.
8. Go to your recovery group and delete the database then the recovery group itself
Now you are able to add your desired users and they will be added to the correct database
What a mess...
How to add yourself as an Exchange Full Administrator without using ESM Delegation in my case this was because I couldn't use the ESM Delegation Wizard
Original issue: An Exchange mailbox had been corrupted and I needed to restore it from a backup. So I thought this should be easy(wrong).
Actions: I setup a Recovery Group just like I was supposed to and mounted the store recovered the mailbox etc.
Problem created: When trying to add a new user the new user's mailbox is created in the recovery group. This has to be one of the dumbest designs ever but, fine I will just delete the recovery group that I created and then recreate the user. Halt! Microsoft decided that is not a good idea and even though I created the RG I can't delete it, mind you I am logged in as a Local/Domain/Enterprise Admin so I should have super powers right? Nope.
Microsoft restricted that aspect to only Exchange Full Administrators(EFA). Fine, I looked around and figured out how to add an account as an EFA, this should be easy right? Wrong.
You cannot add an account to be a EFA unless you have an account and login credentials for an EFA. Now what? Off to Google I go.
A solution finally!
1. Log into the Exchange server with local/domain/ad admin rights
2. Run regedit and navigate to HKEY_CURRENT_USER\Software\Microsoft\Exchange\ExAdmin
3. Create a new dword called ShowSecurityPage
4. Set the value from 0 to 1
5. Close the ESM if open
6. (re)Open the ESM
7. Right click on your Exchange Organization, select properties, Add the desired account with FULL access.
8. Go to your recovery group and delete the database then the recovery group itself
Now you are able to add your desired users and they will be added to the correct database
What a mess...
5.7.09
Run updates from crontab
Simple safe-upgrade script to be run from root's crontab -
Reasoning - I was tired of the way the updater was in Ubuntu recently, that whole pop-under thing is annoying and counter productive. So I wrote a script that safe-update's the system and doesn't need a sudo user to install the updates.
Now, I would not advise using this on a server or mission critical desktop. Who knows what could happen even with only safe-update called...
Setup is near the bottom, read this first.
What update.sh does:
$now is the current date in unix time
$check_date is the current date minus one week
(actually 6 days 23 hours 59 minutes and 45 seconds)
Fist step is:
It checks to see if this script has been run before via a if file exists in bash
if yes then:
It checks to see if current date minus one week is greater than or equal to the last update. So if this was last run over a week ago it will start.
If not it was last updated withing a week it will exit. This _should_ not happen, but is a built in 'failsafe'.
If the file does not exist:
It creates the .update_log and goes on its merry way updating.
What is doens't do:
This script does NOT reboot the machine when done, this was done on purpose for the user(s). This way when they are done for the day they and shutdown the computer will be up to date the next time it is turned on.
WARNING:
Firefox will act crazy if not restarted after updating! This may be covered in the next revision.
Setup:
1. Copy between the CUTs to /root/update.sh via vim/vi/nano/gedit etc. (Yes you need to be root)
2. chmod +x /root/update.sh
3. su root (if you sudo'd in)
4. #crontab -e
5. Setup the crontab the way you like it
5a. Here's mine 30 16 * * 2 /root/update.sh
6. :wq <-- to save the crontab
You may also want crontab to shutdown or reboot the machine after, but that is up to you.
//----------------CUT--------------------------//
#!/bin/bash
# update.sh - DTM
# Get root's paths (as root 'grep bin /root/*')
# this will give the correct shell also
PATH=/usr/local/sbin:"${PATH}"
PATH=/usr/sbin:"${PATH}"
PATH=/sbin:"${PATH}"
# Check last update time
#-----------------------
# Check if file exists get information on last modify time or just create one
# Define vars using Unix time - makes it easier
now=`date +%s`
check_date=$(($now-604785))
# See if file exists
if [ -f /root/.update_log ];
then
last_update=`cat /root/.update_log`
if [ $check_date -ge $last_update ];
then
echo $now > /root/.update_log && aptitude update && aptitude -y safe-upgrade
else
exit
fi # //END COMPARE LOGS
else
echo $now > /root/.update_log && aptitude update && aptitude -y safe-upgrade
fi # //END MAIN IF
//-------------------------CUT--------------//
Reasoning - I was tired of the way the updater was in Ubuntu recently, that whole pop-under thing is annoying and counter productive. So I wrote a script that safe-update's the system and doesn't need a sudo user to install the updates.
Now, I would not advise using this on a server or mission critical desktop. Who knows what could happen even with only safe-update called...
Setup is near the bottom, read this first.
What update.sh does:
$now is the current date in unix time
$check_date is the current date minus one week
(actually 6 days 23 hours 59 minutes and 45 seconds)
Fist step is:
It checks to see if this script has been run before via a if file exists in bash
if yes then:
It checks to see if current date minus one week is greater than or equal to the last update. So if this was last run over a week ago it will start.
If not it was last updated withing a week it will exit. This _should_ not happen, but is a built in 'failsafe'.
If the file does not exist:
It creates the .update_log and goes on its merry way updating.
What is doens't do:
This script does NOT reboot the machine when done, this was done on purpose for the user(s). This way when they are done for the day they and shutdown the computer will be up to date the next time it is turned on.
WARNING:
Firefox will act crazy if not restarted after updating! This may be covered in the next revision.
Setup:
1. Copy between the CUTs to /root/update.sh via vim/vi/nano/gedit etc. (Yes you need to be root)
2. chmod +x /root/update.sh
3. su root (if you sudo'd in)
4. #crontab -e
5. Setup the crontab the way you like it
5a. Here's mine 30 16 * * 2 /root/update.sh
6. :wq <-- to save the crontab
You may also want crontab to shutdown or reboot the machine after, but that is up to you.
//----------------CUT--------------------------//
#!/bin/bash
# update.sh - DTM
# Get root's paths (as root 'grep bin /root/*')
# this will give the correct shell also
PATH=/usr/local/sbin:"${PATH}"
PATH=/usr/sbin:"${PATH}"
PATH=/sbin:"${PATH}"
# Check last update time
#-----------------------
# Check if file exists get information on last modify time or just create one
# Define vars using Unix time - makes it easier
now=`date +%s`
check_date=$(($now-604785))
# See if file exists
if [ -f /root/.update_log ];
then
last_update=`cat /root/.update_log`
if [ $check_date -ge $last_update ];
then
echo $now > /root/.update_log && aptitude update && aptitude -y safe-upgrade
else
exit
fi # //END COMPARE LOGS
else
echo $now > /root/.update_log && aptitude update && aptitude -y safe-upgrade
fi # //END MAIN IF
//-------------------------CUT--------------//
3.7.09
Another run-in with Windows Vista
Where to begin? Well, I am moving back to New York after nine years of living no closer then 9.5 hours by car. With this move comes the oh so fun job hunting. As many of you know, unless you live under a rock, the job market flat out stinks at this point in time. I have applied for 27 jobs and have heard back from one! Anyhow, this whole resume thing and it having to be in the lovely proprietary Microsoft Word format 97% of the time, has gotten a little unruly in OpenOffice. Don't get me wrong OpenOffice is great, when it is not deleting embedded tables in doc files as it is in 3.1, I use it every day for normal document, PDF, spreadsheet application. But, the table dropping was killing me, so I said screw it and installed my copy of Windows Vista Business x32 that came with my Thinkpad.
First off the install was quick, on the 20GB partition I allowed it, but the updates took over 2 hours to download and install! Mind you I do have a 6MB pipe and they were downloaded in less than 10 minutes. Installing should not have taken over an hour and a half on a dual core T7100 1.8Ghz intel with 4GB of ram. After my wait was over sometime around midnight I installed the much needed Antivirus and went to bed, finally.
This morning I installed my Copy of Office 2007, applied service pack one and was on my way to my normal tasks. Checking email, looking at job boards, etc. I soon realized my four legged friend needed to take a little trip outside. So, I closed the lid on my Thinkpad, like I did last night, and took him for a walk. Needless to say I was distracted for a good 3 hours, I happened to be walking into the kitchen when I noticed my amber battery light was on and the little green moon was not! I panicked a little because I have my good battery(7 cell) in and not the little 4 cell that came with it, these are not cheap and I try not to run them below 25% unless it is an absolute necessity.
So now that you are up to date on the on the happenings, I suppose I can show you the picture of what the desktop looked like when I opened the lid.

Lovely heh? Less than 14 hours installed and I get my first BSOD. Someone again tell me why I don't use Microsoft products? As of right now I am only at 31% of my battery, thank you Windows Vista Experience you have made my day and busy weekend for that matter, even better.
I am off to install Ubuntu Linux on the other 60GBs of my hard drive, guess I should have just dealt with VirtualBox OSE's lack of USB support in the free version, thanks a lot Sun! I blame you too.
And by the way I did click the "Find a Solution" button, you know what I got? Nothing....
Thanks again....
First off the install was quick, on the 20GB partition I allowed it, but the updates took over 2 hours to download and install! Mind you I do have a 6MB pipe and they were downloaded in less than 10 minutes. Installing should not have taken over an hour and a half on a dual core T7100 1.8Ghz intel with 4GB of ram. After my wait was over sometime around midnight I installed the much needed Antivirus and went to bed, finally.
This morning I installed my Copy of Office 2007, applied service pack one and was on my way to my normal tasks. Checking email, looking at job boards, etc. I soon realized my four legged friend needed to take a little trip outside. So, I closed the lid on my Thinkpad, like I did last night, and took him for a walk. Needless to say I was distracted for a good 3 hours, I happened to be walking into the kitchen when I noticed my amber battery light was on and the little green moon was not! I panicked a little because I have my good battery(7 cell) in and not the little 4 cell that came with it, these are not cheap and I try not to run them below 25% unless it is an absolute necessity.
So now that you are up to date on the on the happenings, I suppose I can show you the picture of what the desktop looked like when I opened the lid.

Lovely heh? Less than 14 hours installed and I get my first BSOD. Someone again tell me why I don't use Microsoft products? As of right now I am only at 31% of my battery, thank you Windows Vista Experience you have made my day and busy weekend for that matter, even better.
I am off to install Ubuntu Linux on the other 60GBs of my hard drive, guess I should have just dealt with VirtualBox OSE's lack of USB support in the free version, thanks a lot Sun! I blame you too.
And by the way I did click the "Find a Solution" button, you know what I got? Nothing....
Thanks again....
20.6.09
Centos - Mounting NTFS drives
I was brushing up on my CentOS 5.3 skills and needed access to an older NTFS formatted usb drive. I forgot that CentOS doesn't include NTFS-3g support natively, doh!
So here are the few simple commands needed to get it installed:
1. Open a terminal window
2. Su - (or Sudo -s)
3. yum install fuse fuse-ntfs-3g dkms dkms-fuse
4. mkdir /media/win
5. /sbin/fdisk -l <-- to find your drive
6. mount -t ntfs-3g /dev/sdb1 /media/win
Bam you are done!
So here are the few simple commands needed to get it installed:
1. Open a terminal window
2. Su - (or Sudo -s)
3. yum install fuse fuse-ntfs-3g dkms dkms-fuse
4. mkdir /media/win
5. /sbin/fdisk -l <-- to find your drive
6. mount -t ntfs-3g /dev/sdb1 /media/win
Bam you are done!
19.5.09
Oh no windows Viruses on my Linux box!!
This was supremely entertaining.
My Linux box was infected with Windows viruses oh no! As you can see I downloaded the install.exe to help me keep my system clean!. ;)

The not so funny part is that the that the detection @ VirusTotal was 11/40 or 27.5% <--- yuck!
My Linux box was infected with Windows viruses oh no! As you can see I downloaded the install.exe to help me keep my system clean!. ;)

The not so funny part is that the that the detection @ VirusTotal was 11/40 or 27.5% <--- yuck!
13.2.09
Best quote of the week
"The one ray of hope is that maybe, just maybe, the thousands of Windows worms will go to war with each other and kill every Windows machine on earth. Though that would be a short-lived cure, because even after a Windows holocaust the first thing the survivors are going to do is get up, dust themselves off, and see if rebooting will bring their systems back up." -- Carla Schroder
13.1.09
Twitter Address
With having to block Facebook at work due to overzealous users, I have now setup a twitter account. I know, I know who hasn't but anyway here is the address:
http://twitter.com/likuidkewl/
http://twitter.com/likuidkewl/
9.1.09
Newegg Eggsaver shipping - redux
Anyone who has ordered from Newegg.com knows that they sometimes offer free shipping with certain items. I suggest that, unless you have no urgent need for the item, you use UPS or FedEx to ship. The reason is that the Eggsaver shipping is provided by DHL and then handed off to the USPS for final delivery. This is common for small items such as Memory and processors. One major issue I had with this shipping method was that once it was handed off to the USPS DHL stopped reporting its progress, and it seemed that the Newegg shipping tracker didn't track it either. But, if you take your dhl tracking number and navigate your browser to http://webtrack.dhlglobalmail.com plug it in you will see the same information from Newegg but also a link to the USPS tracking number on the bottom right. Now at least you can tell when it arrives in your town.
HTH
HTH
30.12.08
Ubuntu 8.04 dbus and console kit crash
This has been happening randomly since our switch to the lovely Ubuntu server platform. The open bugs at launchpad were a good starting point for information.
What seems to be happening is that the dbus service is crashing and this is evident because the gnome-power-manager service is a screamer and depends on it, so after we restart dbus(#/etc/init.d/dbus restart) two instances of console-kit-daemon are running and fighting with each other for control.
The simple solution was to kill one of them:
$ps aux | grep console-kit-daemon and sudo kill xxxx
or use:
$pidof console-kit-daemon then pick one and kill it or script it to be killed.
We will see if this helps.....
What seems to be happening is that the dbus service is crashing and this is evident because the gnome-power-manager service is a screamer and depends on it, so after we restart dbus(#/etc/init.d/dbus restart) two instances of console-kit-daemon are running and fighting with each other for control.
The simple solution was to kill one of them:
$ps aux | grep console-kit-daemon and sudo kill xxxx
or use:
$pidof console-kit-daemon then pick one and kill it or script it to be killed.
We will see if this helps.....
29.12.08

16.12.08
Latest Midori on the Ubuntu Intrepid eee
If you are like myself and have installed Midori as your default browser in Intrepid you will want to add this PPA.
To do so open a terminal and type:
$sudo mousepad /etc/apt/sources.list
Scroll to the bottom paste in the above ppa save.
Update and upgrade and you have a much more stable Midori/Webkit
(Be warned with some issues with Google's use of java though)
deb http://ppa.launchpad.net/webkit-team/ubuntu intrepid main
deb-src http://ppa.launchpad.net/webkit-team/ubuntu intrepid main
To do so open a terminal and type:
$sudo mousepad /etc/apt/sources.list
Scroll to the bottom paste in the above ppa save.
Update and upgrade and you have a much more stable Midori/Webkit
(Be warned with some issues with Google's use of java though)
23.11.08
Installing Ubuntu 8.10 with Xfce4 on a Asus eee 700 2G Surf
Here I will cover the steps I used to get a cheapo Asus 2G Surf off of Xandros and on Ubuntu 8.10 with minimal system "sluggishness"
Download the Ubuntu 8.10 Intrepid Alternate installation CD from your closest/fastest mirror(IMPORTANT!)
Burn/Copy the ISO to a usable medium for the eee.
I used unetbootin to write the ISO to a 1GB Sandisk thumb drive from Linux, it should be the same using Windows.
Boot the eee using the usb flash drive by pressing esc during the POST process and choosing the medium you setup in the previous step.
When the Ubuntu(unetbootin) menu is displayed select "Text mode install" - This installs only the bare minimum of needed files leaving out the "fluff"
Partitioning:
I am going to say right now that some are not going to agree with my choices of file systems and/or partitions, but this is what worked the best for me and I am not to worried about that old 1GB SD card I barely ever use dying.
My layout is as follows:
Internal Solid State Disk -
/ ROOT is the entire 2GB of the SSD using EXT2
(This is a good idea in order to keep the non-replaceable SSD in good shape, you can read more about journaling file systems and the effect on solid state storage by doing a quick search of the web)
Additional SD card - This where we thrash away at a cheap 1GB SD card
/SWAP is 512 of the SD card (some say this is optional, I disagree)
/TMP is 256 of the SD card on the EXT3 file system (Journaling FS)
/HOME is the remainder of the SD card on EXT3 also
(I am religious in my backups so I am not worried about the SD card going kaput and losing my home directory. If you are not a backup person you may want to become one just in case or not keep anything super important on the eee.)
**I was plugged in to the Internet to get the latest updates and to make the most of my time**
Answer all the questions(...)
Follow all the prompts(...)
After the setup completes in about 45 minutes to an hour we can move on.
We are now going to install a kernel specifically designed for the Asus eee series of netbooks.
To install the new kernel follow the instructions at array.org
They are simple and concise.
Before I rebooted I removed the splash and quiet option from the grub boot options ($sudo vim /boot/grub/menu.lst) so I could see if any errors flew by, then rebooted ($sudo reboot).
Now you have a lean mean Ubuntu 8.10 install with a kernel designed for a eee pc, but we are not done yet.
$sudo aptitude install xfce4 gnome-power-manager
This will take a few minutes, I use the gnome power manager only because there is not a native Xfce program yet.
Keep your eyes here though it looks to be soon.
Now that Xfce is installed lets start it
$startx
**Note you will have to setup xfce to your liking and add the menu/applets of your choosing as it is barren**
A good place to start is here: http://www.xfce.org/about/tour
A quick setup for this tutorial:
Right click the panel(little grey area) and select "Customize Panel" under position select fixed position and in the drop down box select "Full Width" then "Close".
Right click an empty area of the panel and select "Add New Item" scroll down to the bottom and select "Xfce Menu" set it up to your liking and then do the same for "System Tray" and "Task List"(after you add this you will see the gpm and you can edit your settings from there)
If you have any real issues you cannot overcome leave a message here or fire off a quick search on the internet
Now lets install a web browser. Go to the XFCE menu -> Accessories -> Terminal
$sudo aptitude install midori
I like this browser due to the small footprint. Granted it is not as mature as Firefox, but it is webkit based and under heavy development(codeword for a little buggy). You may choose to install firefox instead for surefire compatibility but beware you _will_ notice the difference.
Remember we have not installed the default Xubuntu install so we have no login screen right now. If you feel you don't need one or you just want to show off in front of your friends leave it at the bash login and use startx. If not, you can choose to install GDM(since we met most of the dependencies with the power manager install) or use the old school login manager xdm(personal favorite)
#aptitude install xdm(optional)
Now we have a base system, power management and a login manager. All that is left is network management.
You can go for broke and install network manager, but I try to leave out as much gnome as possible. As such I install WICD
$sudo aptitude install wicd(optional)
Now just add your networks double check your power settings and go for gold!
I have found this setup to be fast and reliable, with some exception for minor Midori issues.
Have fun and feel free to leave any questions or comments you may have.
Download the Ubuntu 8.10 Intrepid Alternate installation CD from your closest/fastest mirror(IMPORTANT!)
Burn/Copy the ISO to a usable medium for the eee.
I used unetbootin to write the ISO to a 1GB Sandisk thumb drive from Linux, it should be the same using Windows.
Boot the eee using the usb flash drive by pressing esc during the POST process and choosing the medium you setup in the previous step.
When the Ubuntu(unetbootin) menu is displayed select "Text mode install" - This installs only the bare minimum of needed files leaving out the "fluff"
Partitioning:
I am going to say right now that some are not going to agree with my choices of file systems and/or partitions, but this is what worked the best for me and I am not to worried about that old 1GB SD card I barely ever use dying.
My layout is as follows:
Internal Solid State Disk -
/ ROOT is the entire 2GB of the SSD using EXT2
(This is a good idea in order to keep the non-replaceable SSD in good shape, you can read more about journaling file systems and the effect on solid state storage by doing a quick search of the web)
Additional SD card - This where we thrash away at a cheap 1GB SD card
/SWAP is 512 of the SD card (some say this is optional, I disagree)
/TMP is 256 of the SD card on the EXT3 file system (Journaling FS)
/HOME is the remainder of the SD card on EXT3 also
(I am religious in my backups so I am not worried about the SD card going kaput and losing my home directory. If you are not a backup person you may want to become one just in case or not keep anything super important on the eee.)
**I was plugged in to the Internet to get the latest updates and to make the most of my time**
Answer all the questions(...)
Follow all the prompts(...)
After the setup completes in about 45 minutes to an hour we can move on.
We are now going to install a kernel specifically designed for the Asus eee series of netbooks.
To install the new kernel follow the instructions at array.org
They are simple and concise.
Before I rebooted I removed the splash and quiet option from the grub boot options ($sudo vim /boot/grub/menu.lst) so I could see if any errors flew by, then rebooted ($sudo reboot).
Now you have a lean mean Ubuntu 8.10 install with a kernel designed for a eee pc, but we are not done yet.
$sudo aptitude install xfce4 gnome-power-manager
This will take a few minutes, I use the gnome power manager only because there is not a native Xfce program yet.
Keep your eyes here though it looks to be soon.
Now that Xfce is installed lets start it
$startx
**Note you will have to setup xfce to your liking and add the menu/applets of your choosing as it is barren**
A good place to start is here: http://www.xfce.org/about/tour
A quick setup for this tutorial:
Right click the panel(little grey area) and select "Customize Panel" under position select fixed position and in the drop down box select "Full Width" then "Close".
Right click an empty area of the panel and select "Add New Item" scroll down to the bottom and select "Xfce Menu" set it up to your liking and then do the same for "System Tray" and "Task List"(after you add this you will see the gpm and you can edit your settings from there)
If you have any real issues you cannot overcome leave a message here or fire off a quick search on the internet
Now lets install a web browser. Go to the XFCE menu -> Accessories -> Terminal
$sudo aptitude install midori
I like this browser due to the small footprint. Granted it is not as mature as Firefox, but it is webkit based and under heavy development(codeword for a little buggy). You may choose to install firefox instead for surefire compatibility but beware you _will_ notice the difference.
Remember we have not installed the default Xubuntu install so we have no login screen right now. If you feel you don't need one or you just want to show off in front of your friends leave it at the bash login and use startx. If not, you can choose to install GDM(since we met most of the dependencies with the power manager install) or use the old school login manager xdm(personal favorite)
#aptitude install xdm(optional)
Now we have a base system, power management and a login manager. All that is left is network management.
You can go for broke and install network manager, but I try to leave out as much gnome as possible. As such I install WICD
$sudo aptitude install wicd(optional)
Now just add your networks double check your power settings and go for gold!
I have found this setup to be fast and reliable, with some exception for minor Midori issues.
Have fun and feel free to leave any questions or comments you may have.
15.11.08
Acer Aspire One - Windows version, OOPS!
Behold the poster child for Linux on Netbooks.

This was shot at my local Staples on 15 November, 2008.
Here is a close up of the screen. I love the part about the CD-ROM.

*Sorry about the quality, it is a camera phone what can I say.
**And this display model is not for sale apparently

This was shot at my local Staples on 15 November, 2008.
Here is a close up of the screen. I love the part about the CD-ROM.

*Sorry about the quality, it is a camera phone what can I say.
**And this display model is not for sale apparently
8.11.08
Custom DrWeb CureIt utility -
As some may know I have switched to Linux for my everyday computing needs. This has left my "Storage" partition mostly untouched for months. Today I re-applied my 'Windows V!sta Business' Image to the Windows partition in order play around over the weekend.
While examining the Storage partition, mainly getting the needed security apps loaded on V!sta, I found a little script I wrote to deal with the DrWeb CureIt update issue(s).
Some may be curious as to what these "issues" are (IMO):
#1 You have to download the entire CureIt utility to have the most current virus definitions every time
#2 The ads that are packed with the program to buy Dr. Web are a bit over the top and annoy me
I understand this is a free tool and they need to make money, but I do believe they can do without my $20 for a spell.
Moving on, this is a simple batch file that can automate the process required to manually update the modified CureIt utility. In reality this is not "CureIt" but a modified version of the normally installable version which goes easily on a USB drive. I got the idea two years ago when CureIt first came out, the way it was packaged made me realize that DrWeb's main scanner didn't have to be installed to sniff out and destroy malware and off I went.
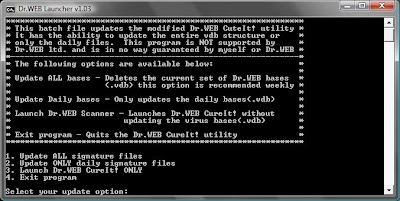
How this script works is simple, there is a zip file that has the needed files in it, simply extract and navigate to the DrWeb_USB folder and run Launch.bat. I have removed all the bases to save space in the download, so you will need to select option #1 the first time.
You may be able to swap out the Drweb32.exe for a newer version but this is not tested and is not supported(Much like the rest of this program). Do not try to use the .exe from the actual newer CureIt versions as Dr.Web has "fixed" it. If you would like to try a newer scanner version, use a installed version and the same goes for a newer .dll.
I do believed I tried this with more recent releases but it failed I think....
DISCLAIMER
If this somehow breaks your computer, which is highly unlikely, it is not my fault.
ALSO
If you feel like you are cheating the good Doctor please by all means buy a license and substitute that for the cureit.key. The only reason this is included is so that everyone can use it.
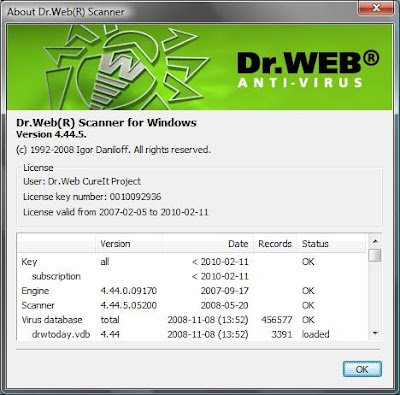
Below are two screen shots
CMD Windows options:
Driver Versions(note vdb's not included):
Here is the link to the zip file:
http://www.zer0-tec.net/files/DrWeb_USB.zip
//If this is illegal it will be promptly removed with word from DrWeb ltd.//
Dan
While examining the Storage partition, mainly getting the needed security apps loaded on V!sta, I found a little script I wrote to deal with the DrWeb CureIt update issue(s).
Some may be curious as to what these "issues" are (IMO):
#1 You have to download the entire CureIt utility to have the most current virus definitions every time
#2 The ads that are packed with the program to buy Dr. Web are a bit over the top and annoy me
I understand this is a free tool and they need to make money, but I do believe they can do without my $20 for a spell.
Moving on, this is a simple batch file that can automate the process required to manually update the modified CureIt utility. In reality this is not "CureIt" but a modified version of the normally installable version which goes easily on a USB drive. I got the idea two years ago when CureIt first came out, the way it was packaged made me realize that DrWeb's main scanner didn't have to be installed to sniff out and destroy malware and off I went.
How this script works is simple, there is a zip file that has the needed files in it, simply extract and navigate to the DrWeb_USB folder and run Launch.bat. I have removed all the bases to save space in the download, so you will need to select option #1 the first time.
You may be able to swap out the Drweb32.exe for a newer version but this is not tested and is not supported(Much like the rest of this program). Do not try to use the .exe from the actual newer CureIt versions as Dr.Web has "fixed" it. If you would like to try a newer scanner version, use a installed version and the same goes for a newer .dll.
I do believed I tried this with more recent releases but it failed I think....
DISCLAIMER
If this somehow breaks your computer, which is highly unlikely, it is not my fault.
ALSO
If you feel like you are cheating the good Doctor please by all means buy a license and substitute that for the cureit.key. The only reason this is included is so that everyone can use it.
Below are two screen shots
CMD Windows options:

Driver Versions(note vdb's not included):

Here is the link to the zip file:
http://www.zer0-tec.net/files/DrWeb_USB.zip
//If this is illegal it will be promptly removed with word from DrWeb ltd.//
Dan
30.10.08
Ubuntu 8.10 Released.. With issues...
I think I am just p-o'd that Canonical released Ubuntu 8.10 with a bug that affects me in a major way. This one:
https://bugs.launchpad.net/ubuntu/+source/linux/+bug/264789
How can you release a distribution this day in age and have severe issues with USB storage of all things? UGH!
https://bugs.launchpad.net/ubuntu/+source/linux/+bug/264789
How can you release a distribution this day in age and have severe issues with USB storage of all things? UGH!
27.10.08
Dropped the Tomato....
Well it was a nice run but it seems that the Tomato Firmware series of old has gone and all that is left are the remnants of what was once great.
Some may say "Wait Tomato still R0X!" But I am sorry my friends, it does so no longer. I feel that ever since the 1.07 version things have gone steadily downhill. Jon _has_ given out the code and others _have_ tried to improve the issues that arise, kudos to them. But when a router locks because someone is using a Intel Wireless card on a client machine this is by far unacceptable. It saddens me to say that this issue has been known and still remains. Do not think that I don't appreciate all the work that went into this project because I do, I am very grateful. But how does something like this go on for months?
As such I have switched from Tomato to DD-WRT v24-sp1, as of this posting I am up over 8 days and no lockups. Where as with Tomato I would have had to reboot 2-3 times already.
Again, thanks Jon for the time and effort. No ill will is intended in this posting.
Some may say "Wait Tomato still R0X!" But I am sorry my friends, it does so no longer. I feel that ever since the 1.07 version things have gone steadily downhill. Jon _has_ given out the code and others _have_ tried to improve the issues that arise, kudos to them. But when a router locks because someone is using a Intel Wireless card on a client machine this is by far unacceptable. It saddens me to say that this issue has been known and still remains. Do not think that I don't appreciate all the work that went into this project because I do, I am very grateful. But how does something like this go on for months?
As such I have switched from Tomato to DD-WRT v24-sp1, as of this posting I am up over 8 days and no lockups. Where as with Tomato I would have had to reboot 2-3 times already.
Again, thanks Jon for the time and effort. No ill will is intended in this posting.
22.10.08

17.10.08
The 'e1000 nasty' firmware fix announced via Suse
For those affected, there has been a message sent to the lkml in regards to fixing corrupted firmware.
See here:
http://lkml.org/lkml/2008/10/17/214
See here:
http://lkml.org/lkml/2008/10/17/214
Subscribe to:
Posts (Atom)