Here I will cover the steps I used to get a cheapo Asus 2G Surf off of Xandros and on Ubuntu 8.10 with minimal system "sluggishness"
Download the Ubuntu 8.10 Intrepid Alternate installation CD from your closest/fastest mirror(IMPORTANT!)
Burn/Copy the ISO to a usable medium for the eee.
I used unetbootin to write the ISO to a 1GB Sandisk thumb drive from Linux, it should be the same using Windows.
Boot the eee using the usb flash drive by pressing esc during the POST process and choosing the medium you setup in the previous step.
When the Ubuntu(unetbootin) menu is displayed select "Text mode install" - This installs only the bare minimum of needed files leaving out the "fluff"
Partitioning:
I am going to say right now that some are not going to agree with my choices of file systems and/or partitions, but this is what worked the best for me and I am not to worried about that old 1GB SD card I barely ever use dying.
My layout is as follows:
Internal Solid State Disk -
/ ROOT is the entire 2GB of the SSD using EXT2
(This is a good idea in order to keep the non-replaceable SSD in good shape, you can read more about journaling file systems and the effect on solid state storage by doing a quick search of the web)
Additional SD card - This where we thrash away at a cheap 1GB SD card
/SWAP is 512 of the SD card (some say this is optional, I disagree)
/TMP is 256 of the SD card on the EXT3 file system (Journaling FS)
/HOME is the remainder of the SD card on EXT3 also
(I am religious in my backups so I am not worried about the SD card going kaput and losing my home directory. If you are not a backup person you may want to become one just in case or not keep anything super important on the eee.)
**I was plugged in to the Internet to get the latest updates and to make the most of my time**
Answer all the questions(...)
Follow all the prompts(...)
After the setup completes in about 45 minutes to an hour we can move on.
We are now going to install a kernel specifically designed for the Asus eee series of netbooks.
To install the new kernel follow the instructions at array.org
They are simple and concise.
Before I rebooted I removed the splash and quiet option from the grub boot options ($sudo vim /boot/grub/menu.lst) so I could see if any errors flew by, then rebooted ($sudo reboot).
Now you have a lean mean Ubuntu 8.10 install with a kernel designed for a eee pc, but we are not done yet.
$sudo aptitude install xfce4 gnome-power-manager
This will take a few minutes, I use the gnome power manager only because there is not a native Xfce program yet.
Keep your eyes here though it looks to be soon.
Now that Xfce is installed lets start it
$startx
**Note you will have to setup xfce to your liking and add the menu/applets of your choosing as it is barren**
A good place to start is here: http://www.xfce.org/about/tour
A quick setup for this tutorial:
Right click the panel(little grey area) and select "Customize Panel" under position select fixed position and in the drop down box select "Full Width" then "Close".
Right click an empty area of the panel and select "Add New Item" scroll down to the bottom and select "Xfce Menu" set it up to your liking and then do the same for "System Tray" and "Task List"(after you add this you will see the gpm and you can edit your settings from there)
If you have any real issues you cannot overcome leave a message here or fire off a quick search on the internet
Now lets install a web browser. Go to the XFCE menu -> Accessories -> Terminal
$sudo aptitude install midori
I like this browser due to the small footprint. Granted it is not as mature as Firefox, but it is webkit based and under heavy development(codeword for a little buggy). You may choose to install firefox instead for surefire compatibility but beware you _will_ notice the difference.
Remember we have not installed the default Xubuntu install so we have no login screen right now. If you feel you don't need one or you just want to show off in front of your friends leave it at the bash login and use startx. If not, you can choose to install GDM(since we met most of the dependencies with the power manager install) or use the old school login manager xdm(personal favorite)
#aptitude install xdm(optional)
Now we have a base system, power management and a login manager. All that is left is network management.
You can go for broke and install network manager, but I try to leave out as much gnome as possible. As such I install WICD
$sudo aptitude install wicd(optional)
Now just add your networks double check your power settings and go for gold!
I have found this setup to be fast and reliable, with some exception for minor Midori issues.
Have fun and feel free to leave any questions or comments you may have.
15.11.08
Acer Aspire One - Windows version, OOPS!
Behold the poster child for Linux on Netbooks.

This was shot at my local Staples on 15 November, 2008.
Here is a close up of the screen. I love the part about the CD-ROM.

*Sorry about the quality, it is a camera phone what can I say.
**And this display model is not for sale apparently

This was shot at my local Staples on 15 November, 2008.
Here is a close up of the screen. I love the part about the CD-ROM.

*Sorry about the quality, it is a camera phone what can I say.
**And this display model is not for sale apparently
8.11.08
Custom DrWeb CureIt utility -
As some may know I have switched to Linux for my everyday computing needs. This has left my "Storage" partition mostly untouched for months. Today I re-applied my 'Windows V!sta Business' Image to the Windows partition in order play around over the weekend.
While examining the Storage partition, mainly getting the needed security apps loaded on V!sta, I found a little script I wrote to deal with the DrWeb CureIt update issue(s).
Some may be curious as to what these "issues" are (IMO):
#1 You have to download the entire CureIt utility to have the most current virus definitions every time
#2 The ads that are packed with the program to buy Dr. Web are a bit over the top and annoy me
I understand this is a free tool and they need to make money, but I do believe they can do without my $20 for a spell.
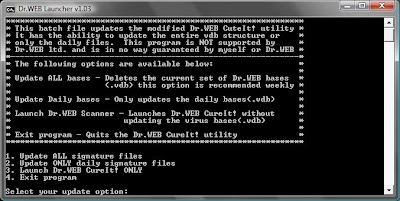
Moving on, this is a simple batch file that can automate the process required to manually update the modified CureIt utility. In reality this is not "CureIt" but a modified version of the normally installable version which goes easily on a USB drive. I got the idea two years ago when CureIt first came out, the way it was packaged made me realize that DrWeb's main scanner didn't have to be installed to sniff out and destroy malware and off I went.
How this script works is simple, there is a zip file that has the needed files in it, simply extract and navigate to the DrWeb_USB folder and run Launch.bat. I have removed all the bases to save space in the download, so you will need to select option #1 the first time.
You may be able to swap out the Drweb32.exe for a newer version but this is not tested and is not supported(Much like the rest of this program). Do not try to use the .exe from the actual newer CureIt versions as Dr.Web has "fixed" it. If you would like to try a newer scanner version, use a installed version and the same goes for a newer .dll.
I do believed I tried this with more recent releases but it failed I think....
DISCLAIMER
If this somehow breaks your computer, which is highly unlikely, it is not my fault.
ALSO
If you feel like you are cheating the good Doctor please by all means buy a license and substitute that for the cureit.key. The only reason this is included is so that everyone can use it.
Below are two screen shots
CMD Windows options:
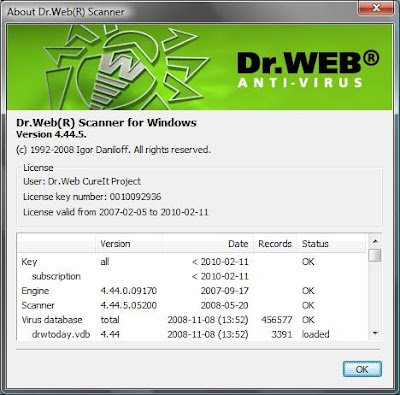
Driver Versions(note vdb's not included):
Here is the link to the zip file:
http://www.zer0-tec.net/files/DrWeb_USB.zip
//If this is illegal it will be promptly removed with word from DrWeb ltd.//
Dan
While examining the Storage partition, mainly getting the needed security apps loaded on V!sta, I found a little script I wrote to deal with the DrWeb CureIt update issue(s).
Some may be curious as to what these "issues" are (IMO):
#1 You have to download the entire CureIt utility to have the most current virus definitions every time
#2 The ads that are packed with the program to buy Dr. Web are a bit over the top and annoy me
I understand this is a free tool and they need to make money, but I do believe they can do without my $20 for a spell.
Moving on, this is a simple batch file that can automate the process required to manually update the modified CureIt utility. In reality this is not "CureIt" but a modified version of the normally installable version which goes easily on a USB drive. I got the idea two years ago when CureIt first came out, the way it was packaged made me realize that DrWeb's main scanner didn't have to be installed to sniff out and destroy malware and off I went.
How this script works is simple, there is a zip file that has the needed files in it, simply extract and navigate to the DrWeb_USB folder and run Launch.bat. I have removed all the bases to save space in the download, so you will need to select option #1 the first time.
You may be able to swap out the Drweb32.exe for a newer version but this is not tested and is not supported(Much like the rest of this program). Do not try to use the .exe from the actual newer CureIt versions as Dr.Web has "fixed" it. If you would like to try a newer scanner version, use a installed version and the same goes for a newer .dll.
I do believed I tried this with more recent releases but it failed I think....
DISCLAIMER
If this somehow breaks your computer, which is highly unlikely, it is not my fault.
ALSO
If you feel like you are cheating the good Doctor please by all means buy a license and substitute that for the cureit.key. The only reason this is included is so that everyone can use it.
Below are two screen shots
CMD Windows options:

Driver Versions(note vdb's not included):

Here is the link to the zip file:
http://www.zer0-tec.net/files/DrWeb_USB.zip
//If this is illegal it will be promptly removed with word from DrWeb ltd.//
Dan
Subscribe to:
Posts (Atom)